


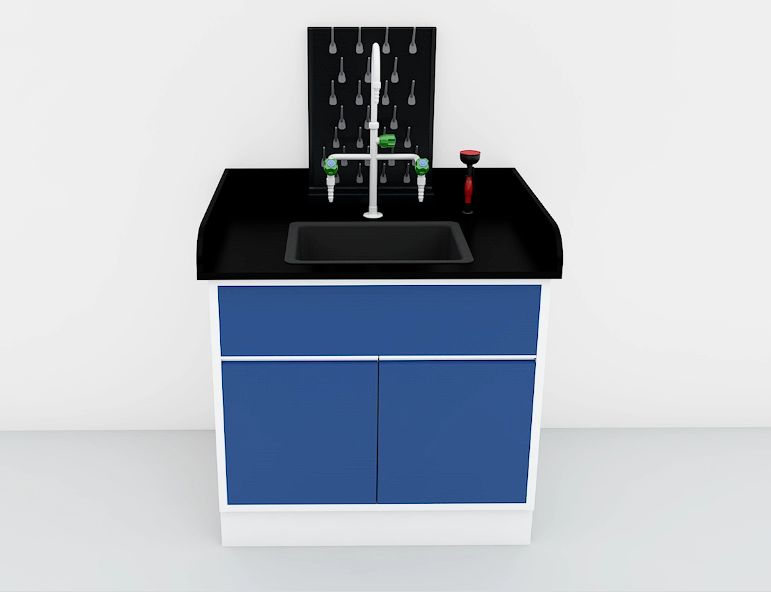
Description
Key Specifications and First Selection
A lab sink cabinet is the floor-standing casework below a selected laboratory sink and countertop. Its job is not simply to hide plumbing. The cabinet must leave a workable route for the drain, trap, hot and cold lines, valves and service access while supporting the selected front style, work height and surrounding casework layout. For a new laboratory or renovation, those interface decisions usually determine whether a single-door or double-door laboratory sink base cabinet is the practical choice.
The first decision is the configuration, not a generic cabinet size. A compact single-door cabinet can suit a small wall-side wash point or a seated work position. A wider double-door arrangement can give a service technician more access around the trap and supply lines. Where a project has an accessibility target, the under-counter opening, front profile, worktop height and plumbing protection must be coordinated on the project drawing rather than assumed from an “ADA” label.
What This Cabinet Is Selected To Do
- Support the selected countertop and sink arrangement with an under-counter casework enclosure.
- Keep drain, trap, supply lines and shut-off points reachable after installation when the selected access configuration requires it.
- Match a single-door, double-door or open-front planning approach to the available service space.
- Coordinate visually and dimensionally with Laboratory Base Cabinet runs, not replace the sink, faucet or plumbing package.
Reference Formats for Planning
| Reference configuration | Front and access direction | Appropriate planning use | Confirm before production |
|---|---|---|---|
| 24 x 22 x 28 in single-door format | One door with compact under-counter volume | Small wash point or seated-height concept | Sink footprint, drain location, toe space and selected worktop height |
| 36 x 22 x 35 in double-door format | Wider front access below a standing worktop | General wall-side laboratory sink layout | Door swing, trap clearance, pipe route and adjacent cabinet interfaces |
| 36 x 22 x 32.5 in accessibility-target format | Under-counter planning package | Layouts reviewed for accessible use | Local code, final knee/toe space, top height and plumbing protection |
| 22 in deep stainless reference format | Single-door service cabinet concept | Projects preferring stainless below a selected sink | Final width, material thickness, front profile and support details |
These references help establish the drawing conversation; they are separate published configurations and must not be combined into one dimensional promise. A custom lab sink base cabinet is scheduled from the selected sink, top and plumbing arrangement, then checked against room walls, neighboring casework, clearances and installation access.
Product Scope and Supply Boundary
The laboratory sink base cabinet is an enclosure and support interface. It can be configured with the required doors, removable front treatment, back access, bottom access, plinth or leveling arrangement, but it should not be read as an unconditional package containing every item above and behind it. A clear supply boundary prevents a cabinet drawing from reaching site without the information needed to fit the sink and services.
Cabinet Scope Versus Sink-System Scope
The final cabinet schedule should state whether the cabinet includes only the casework body and front, or also selected support members, access panels and top-interface preparation. The sink bowl, worktop, cut-out, faucet, drain assembly, trap, shut-off valves, flexible connectors and wall or floor utility connection are separate scope items unless the order line expressly includes them. That distinction is especially important when a countertop supplier and a plumbing contractor work from different drawings.
Select Access for the Service Route
A removable false front can preserve a consistent casework appearance while giving access to a sink lip or faucet connection. An open or removable back can simplify inspection of wall-side pipes. A removable bottom can assist a floor-drain or vertical-service route. Each is a selected configuration, not a feature automatically supplied on every laboratory sink cabinet. The selected route should be shown before door hinges, shelves and internal members are fixed.
Start with the Items That Actually Occupy the Cabinet
Under-sink space is often overestimated on an elevation drawing. The bowl depth, drain tailpiece, trap, hot and cold supply lines, valves, flexible hoses and any selected treatment connection all occupy space that may cross the apparent shelf or door opening. The product layout therefore needs both the front elevation and a section or plan view through the cabinet. This is also where a centered bowl, offset drain or wall-mounted faucet can change the best door arrangement. Treating the cabinet as an empty rectangular box pushes these conflicts to the installation stage, when a panel or pipe may have to be changed.
Define Included Preparation in the Quote
The order can identify a body opening, false-front treatment, back access or other preparation for a selected interface. It should separately say whether a worktop cut-out, sink support, faucet hole, drain connection or site plumbing work is included. That wording gives purchasing, the countertop fabricator and the installer the same boundary. It also prevents a broad phrase such as “sink cabinet” from being read as a complete wet-service installation.
Do Not Select It as a Generic Base Cabinet
A standard Laboratory Base Cabinet may be appropriate away from wet services, but it does not automatically provide the interface clearance required by a sink. Conversely, a laboratory sink base cabinet is not a substitute for the Laboratory Countertop or the sink fixture. The three items need one coordinated layout.
Sink, Countertop and Plumbing Access
The sink interface is the controlling detail for this product family. A cabinet can fit neatly under a worktop and still be unusable if the cut-out, drain, trap, valve locations or faucet holes were finalized after the cabinet body was made. Start with the selected sink drawing, then locate the bowl, waste outlet and water connections relative to the cabinet centerline, side panels, back panel and front rail.
Coordinate the Interface as One Assembly
The project drawing should identify the countertop material and thickness, selected sink mounting method, cut-out shape, faucet-hole pattern, drain size, trap envelope, supply-valve position and direction of the service route. Where a sink is undermounted or has a particular rim/load path, the cabinet and countertop supplier must confirm how that load is carried. A sink base cabinet supports the overall arrangement; it does not establish a universal mounting method for every bowl.
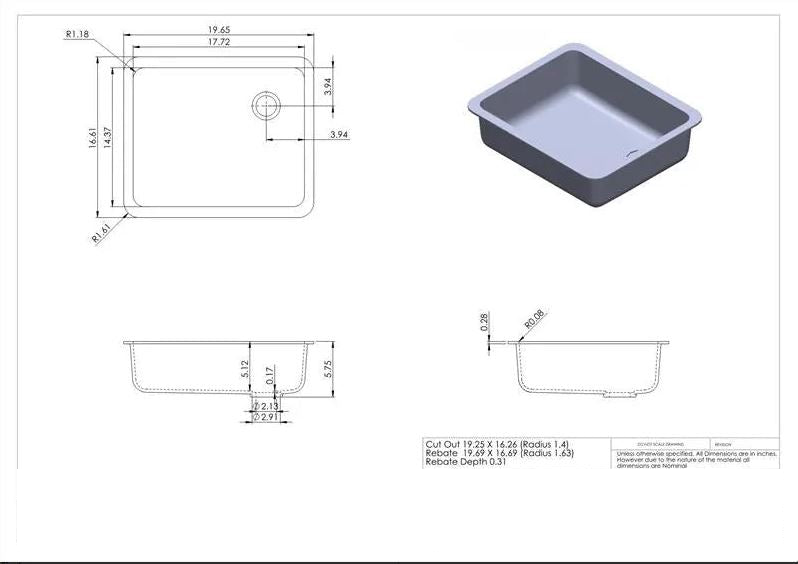
Use the Cut-Out Figure as a Reference Only
The illustration below shows the type of dimensions that must be reconciled before a top is fabricated: bowl outline, cut-out, rim/rebate depth, drain location and overall underside depth. It is not a release drawing for every laboratory sink cabinet. The final sink manufacturer drawing and selected countertop specification control the actual cut-out.
Plumbing Access Must Remain Practical
Leave room to install and service the drain tailpiece, trap, branch connection, supply valves and any selected treatment or monitoring connection. An access opening that is large enough for pipe installation but cannot reach a valve or remove a trap does not solve the maintenance problem. A project should therefore show not only pipe centerlines but also the direction in which parts must be removed, the door opening arc and the position of adjacent drawers or cabinets.
Countertop Geometry Changes the Cabinet Decision
The countertop controls more than the visible edge above the door. Its thickness and overhang affect the finished height, the position of the false front and the room left above the cabinet for the sink rim and hardware. A deep bowl can extend well below the top plane, while a shallow bowl may allow a different support or service arrangement. Where a backsplash, side splash or wall return is required, the drawing should also establish whether the cabinet must be scribed to a wall, held clear for installation or aligned with an adjacent bench run. These checks are small on paper but prevent a finished sink from conflicting with the cabinet rail or plumbing access.
Make Future Service Part of the Design
The project team should decide how a trap, supply valve or hose will be reached after the sink has been used for years, not only how it will be connected on installation day. A removable access panel can be useful when the route is known, but it should not be placed without confirming what it needs to expose. For wall-entry services, rear access may be more helpful; for floor-entry services, bottom access can be the governing condition. The cabinet should retain enough practical reach for the selected maintenance task without leaving unnecessary gaps in the enclosure.
Wet-Service Material Decisions
For a steel laboratory sink base cabinet, selected powder-coated construction may suit a controlled laboratory interior. For a stainless steel laboratory sink base cabinet, Type 304 stainless is a possible specified construction direction where the selected environment and cleaning approach warrant it. Neither phrase by itself confirms resistance to a particular chemical, spill or cleaning program. Material, seams, cut edges, drain leakage exposure and cleaning chemistry should be reviewed together for the actual project.
Cabinet Construction, Materials and Hardware
The right laboratory sink cabinet construction is determined by the cabinet’s support role, its wet-service exposure and the way the plumbing enters the enclosure. Doors, side panels, back arrangement, base level and internal clearances have to work together. Adding shelves or a fixed center member without checking the drain path can turn useful storage volume into an obstruction.
Front and Door Arrangement
A single-door format keeps a compact cabinet front simple and can be useful where the sink is centered over a narrow module. A double-door arrangement can widen the accessible opening for a trap and valve service route. The correct choice depends on the selected cabinet width, nearby walls, hinge clearance, required opening and how the site team will reach the plumbing after commissioning. Door style is a configuration decision, not an indicator of sink capacity or cabinet material.
Material and Finish Selection
Powder-coated steel and Type 304 stainless steel are both possible construction directions for laboratory sink base casework. The project should select the body material, finish, exposed-edge treatment and hardware after reviewing the actual cleaning practice, humidity, anticipated splash exposure and chemical environment. A material label alone cannot establish suitability for aggressive reagents, continuous wetting or a corrosive process stream.
Internal Access and Hardware
The selected cabinet can be arranged with an open or removable back, removable false front, removable bottom and service-friendly internal clearances. These options should be identified on the cabinet schedule because they change how plumbing is installed and repaired. Avoid describing every access option as standard: a custom cabinet can be supplied around the actual drain route, but only after the route is known.
Construction Decisions That Need to Appear on the Schedule
The cabinet schedule should identify the aspects that affect fit and service rather than relying on a general material label. For example, a door can be configured to open toward a clear aisle, but that is only useful if the handle and hinge side do not conflict with a neighboring cabinet or wall. A rear access treatment can accommodate wall-side plumbing, but it needs to correspond to the actual penetration height. The panel layout should also preserve the support and alignment required by the selected top. These decisions create a cabinet that can be manufactured and installed as part of a casework run rather than treated as an isolated box.
| Construction decision | Why it matters below a sink | Project choice to record | Resulting cabinet coordination |
|---|---|---|---|
| Door quantity and hinge direction | Sets the practical service opening and aisle clearance | Single or double doors, swing direction and handle side | Front access can be checked with nearby furniture and equipment |
| Back and bottom arrangement | Determines how wall or floor services enter | Fixed, open or removable back; fixed or removable bottom | Pipe route and maintenance opening are defined before fabrication |
| Top support and false front | Interfaces with sink rim, cut-out and counter edge | Selected top thickness, bowl mounting and front treatment | Cabinet rails and support members can avoid the sink interface |
| Material and finish | Affects cleaning approach and exposed wet-service edges | Selected powder-coated steel or stainless direction | Body, seams, edge details and hardware are scheduled for the room |
Cabinet-to-Top Relationship
The cabinet body must be checked with the selected top overhang, sink cut-out, front rail position and any required support members. When the countertop and sink are supplied separately, the final drawing should state which party provides the cut-out, who verifies the support arrangement and how the finished top is secured. This is a coordination control, not an added product claim.
Avoid Unplanned Internal Obstructions
Internal dividers, fixed shelves and back rails may be useful in an ordinary storage cabinet but can obstruct a sink trap or valve. If internal storage is required, it should be positioned around the documented service envelope instead of being assumed from a standard cabinet layout. This also applies to waste containers, dosing equipment or filters that a project may later wish to place below the sink. The supplied cabinet scope can accommodate selected needs, but the final arrangement should be declared before internal components are fixed.
Installation, Clearances and Maintenance Planning
Installation should be planned from the service envelope rather than only the cabinet face. A laboratory sink base cabinet needs a level finished position, a countertop interface, a practical path for the drain and supply lines, and enough space to operate the doors and reach the service points. The room drawing should also show whether pipes enter through the wall, floor or adjacent casework, because that decision affects the selected back and bottom construction.
Check the Cabinet Envelope Before Fabrication
Confirm finished width, depth and top-of-counter height with the actual room dimensions. Check wall projection, baseboard condition, floor level, adjacent casework, outlet boxes, pipe penetrations, backsplash and door swing. Where the project is designed for an accessible work position, the complete clearance and protection detail must be reviewed against the applicable local requirements; a reference cabinet height is not proof of compliance.
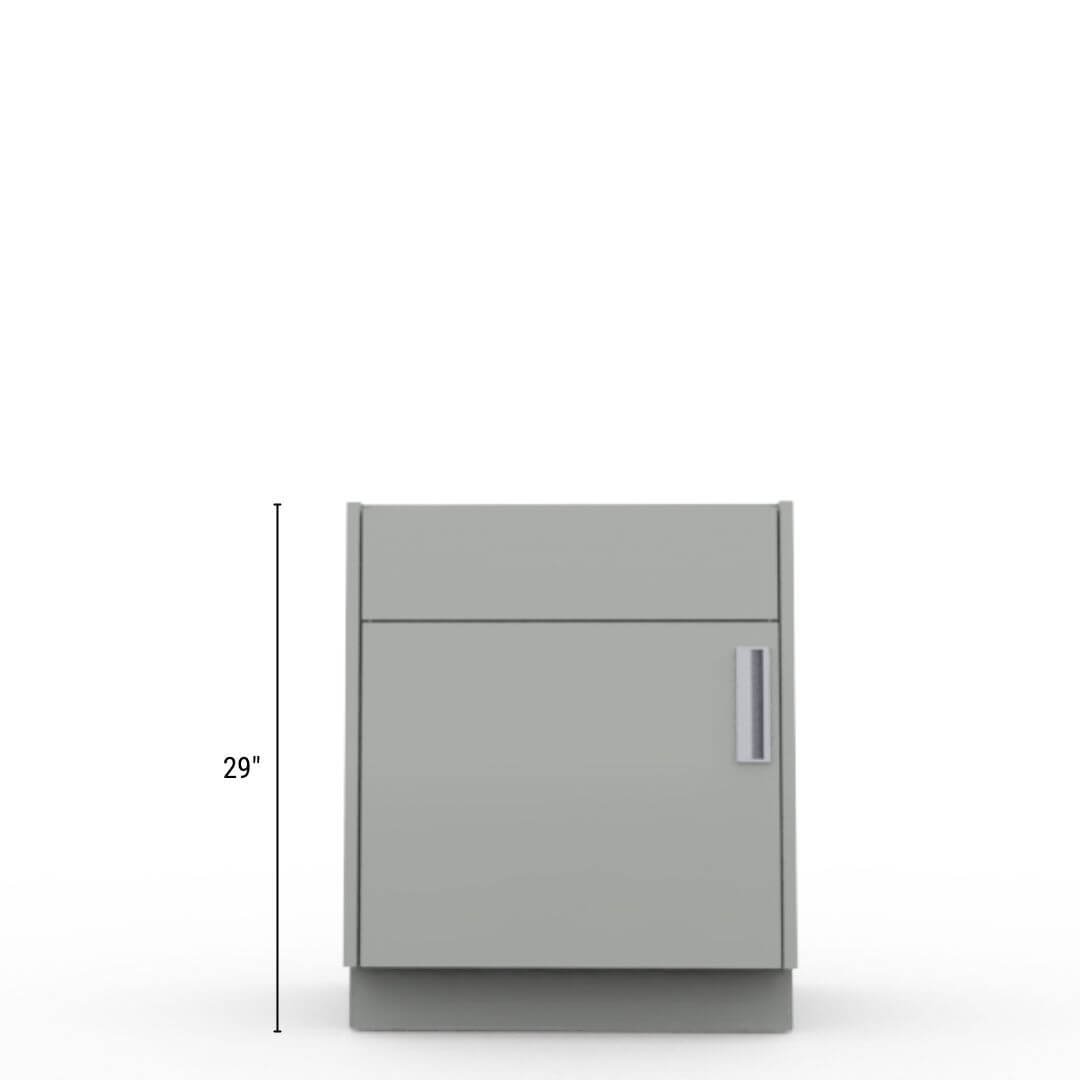
Reference Height Illustration
The figure provides a visual reference for an under-counter single-door cabinet height relationship. It supports early layout discussion but does not replace the selected sink, top, plinth and finished-floor dimensions. Final height is set by the project work surface, sink mounting, user requirement and installation drawing.
Installation Inputs to Freeze
| Installation input | Why it affects the cabinet | Information to provide | Coordination result |
|---|---|---|---|
| Sink and countertop drawing | Sets cut-out, support and front-rail relationship | Sink model drawing, top material and mounting method | Cabinet top interface and support approach can be scheduled |
| Drain and supply route | Determines back/bottom access and internal clearance | Pipe centerlines, valve locations, trap envelope and entry direction | Service openings and interference checks can be defined |
| Finished work height | Changes cabinet height, plinth and front alignment | Finished-floor datum and target top height | Under-counter cabinet envelope can be set correctly |
| Adjacent casework and walls | Controls side clearance, door swing and scribing | Plan, elevations, wall conditions and neighboring cabinet IDs | Installation sequence and final fit can be coordinated |
Maintenance Is a Layout Requirement
Maintenance access should be considered before the doors and panels are finalized. A technician may need to isolate water, remove a trap, inspect a drain connection or replace a faucet hose without removing the countertop. Identify the expected access route in the drawing and select removable panels only where they serve that route. This keeps the cabinet configuration practical without adding unnecessary openings.
Sequence the Work Around the Finished-Floor Datum
Cabinet height is meaningful only when the finished-floor datum and countertop thickness are known. Uneven floors, a raised floor system or a change in flooring finish can alter the relationship between the base, door alignment and top-of-counter height. Set the cabinet run from a common datum, then coordinate leveling provision and top installation with the site conditions. The installer should not be asked to solve a mismatch between a fixed cabinet body and an unconfirmed sink/top height by altering the plumbing after the fact.
Delivery and Replacement Access
Before release, check the available path from unloading to the laboratory room, including door openings, turns, lifts and any completed casework that narrows access. The cabinet may be compact, but the chosen countertop or sink can change the installation sequence. Where the top is installed after the cabinet, protect the unfinished cabinet opening and retain access for final pipe connection. These are straightforward planning inputs that reduce disruption when the wet-service package reaches site.
Applications, Related Products and Selection Boundary
Laboratory sink base cabinets are used below wash points in teaching, analytical, quality-control and process-support rooms where a countertop and sink are planned as part of a casework run. They can be arranged on a perimeter wall or as part of an island layout, subject to the actual service route and the selected sink/top package. The product is suited to a project that needs purpose-planned under-sink access, not merely storage below a work surface.
Choose This Product Family When
- The room layout includes a laboratory sink with a defined countertop and plumbing route.
- The cabinet needs a door, false-front, back or bottom arrangement selected around the trap and valves.
- A standard storage cabinet would obstruct the required wet-service connections.
- The project can provide the sink drawing, top interface and installation conditions before fabrication.
Coordinate These Related Products
Use Laboratory Countertop content to establish the top material, cut-out and finished work surface. Use Laboratory Wall Bench for wall-side layouts and Laboratory Island Bench where the sink forms part of a freestanding service run. Nearby Laboratory Base Cabinet modules can be scheduled in the same elevation, but their shelves, backs and internal members must not be copied into the sink module without checking the plumbing route.
Do Not Use It as a Substitute for the Sink System
This product is not the sink bowl, faucet, emergency shower, chemical storage cabinet, mobile cart or a general base cabinet with no wet-service coordination. It does not establish drain capacity, water quality, chemical compatibility, accessibility compliance or utility performance. Those items remain part of the selected fixture, plumbing design, building services and project acceptance work.
Frequently Asked Questions
Is the sink included with the laboratory sink base cabinet?
The cabinet, sink bowl, countertop, faucet, drain and plumbing fittings should be listed separately unless a final quotation specifically includes them in one package. This separation lets the cabinet be configured around the selected sink and service route.
Can the cabinet be made with a removable back or bottom?
An open or removable back and a removable bottom can be selected where they support wall-side or floor-entry plumbing access. The drawing should show the actual route before these features are specified.
What size laboratory sink cabinet should be selected?
Start with the selected sink and worktop. Reference formats such as 24 x 22 x 28 in and 36 x 22 x 35 in help early layout planning, but finished width, height, front arrangement and access clearances are confirmed for the project.
Is stainless steel required for every wet-service cabinet?
No. Powder-coated steel and Type 304 stainless are possible material directions. The selected material depends on the cleaning regime, splash exposure, surrounding environment and the project’s specification.
Contact the Xicheng Engineering Team Today
Send the sink drawing, countertop material and thickness, required cabinet width/depth/finished height, door preference, drain and supply locations, and room layout. The proposed configuration can then identify the cabinet access arrangement, material direction, interface details and commercial scope for the selected laboratory sink base cabinet.
Shenzhen Office: No. 34 Zhenxing Road (Shengtaian Heavy Industrial Park B), Loucun, Guangming New Dist, Shenzhen, Guangdong, China
WhatsApp: +86 18126478161
Engineering Mailbox: fanalax34@gmail.com