


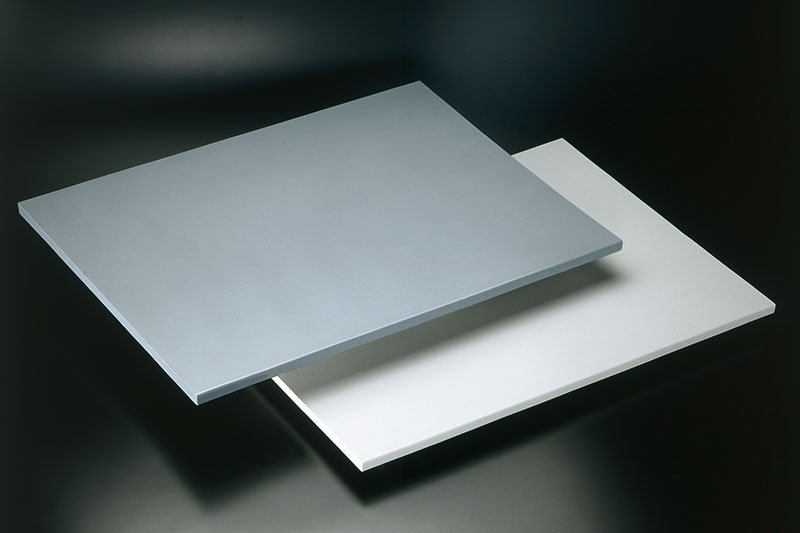
Description
A laboratory countertop is the horizontal work surface that turns a cabinet run, support frame or laboratory island into a usable work area. It can be fabricated as a straight run, L-shaped return, island section, sink work surface or equipment-support surface. The practical decisions are not limited to length and depth. A laboratory worktop must also be selected for the chemicals it may contact, temperature and heat exposure, cleaning method, moisture, expected impact, equipment openings, liquid-control details and the support available beneath it.
The material choice changes the rest of the specification. A solid cast epoxy resin worktop, a solid phenolic resin worktop, a technical ceramic top and a stainless steel worktop do not share one universal thickness, span, edge profile or chemical-performance statement. A stainless construction can include selected reinforcement and an integral welded sink; a ceramic configuration can use a rigid 25 mm reference surface; resin systems can provide different thicknesses, edges and joint methods. The appropriate configuration is the one whose material, fabrication and support details match the actual laboratory task.
Key Specifications and First Selection
What defines a laboratory countertop rather than a general surface
The laboratory countertop page covers the fabricated work surface, including the selected material, finished size, machining and approved edge/joint details. It does not automatically include the base cabinet, open frame, sink, faucet, service fixtures or building installation. Those related products have to be planned with the countertop, but their scope and construction remain separate unless the order schedule explicitly combines them.
This distinction helps prevent a common specification error. A buyer may choose a worktop material from a chemical requirement, then assume that a cabinet, sink opening, backsplash or supporting frame will be supplied in a standard form. In practice, each of those items affects the finished countertop. A sink cutout needs a defined bowl and mounting approach. A raised edge changes how liquid is contained and how the worktop is joined. A long, heavy or heavily machined top needs the correct support, joint and delivery arrangement. The countertop should be reviewed as a fabricated project component, not selected from a material name alone.
Material selection snapshot
The reference formats below help establish the first comparison. They are material-specific reference configurations, not one product that combines all thicknesses, panel dimensions and performance claims. The final worktop is selected from the approved material series and project drawing.
| Material Configuration | Reference Format or Construction | Appropriate First Selection Context | Confirm Before Order |
|---|---|---|---|
| Solid cast epoxy resin | 25 mm reference worktop; 19 mm and 32 mm alternatives occur in documented systems | Chemical-exposure areas, general chemistry work, selected heat/impact demands and fabricated laboratory runs | Actual chemicals, concentration, temperature, edge profile, support, joint layout and selected epoxy series |
| Solid phenolic resin | 19 mm or 25 mm compact phenolic reference construction | Projects balancing chemical resistance, lower mass, machining flexibility and material cost | Chemical list, heat sources, board thickness, exposed edges, support span and selected panel series |
| Technical ceramic | 25 mm reference construction; one documented series spans 600 x 600 to 1800 x 900 mm | Rigid, hard work surface required for the defined process and available panel layout | Chosen ceramic system, impact risk, sink/cutout geometry, joints, colour and support arrangement |
| Stainless steel | Type 304 or 316, 14 or 16 gauge and #4 finish are reference options in stainless worktop families | Cleanable, high-moisture, wet-service or selected integral-sink applications | Grade, gauge, finish, reinforcement, welded details, splashes, sink geometry and exposure conditions |
Check these inputs before choosing a worktop
Start with the process rather than the preferred colour or thickness. Provide a list of the liquids, powders, cleaners and disinfectants that can reach the work surface, along with concentration, temperature, contact duration and spill-cleaning practice. Include hotplates, ovens, open flame, cryogenic items, heavy instruments and any activity likely to introduce impact or concentrated loading. These inputs establish whether the leading material should be epoxy, phenolic, ceramic, stainless steel or another separately confirmed laboratory surface.
Next, define the fabricated geometry. A useful drawing shows finished length and depth, return corners, wall deviations, front/side/back edge treatment, backsplashes, drip grooves, seam positions and the desired completed height. Add sink, faucet, cup-sink, fixture, electrical, equipment and cable openings with centre lines, W x D dimensions, corner radii and mounting method. The opening schedule should be reviewed before material is cut, especially near edges, joints, supports and heavy equipment.
Finally, confirm what will carry the worktop. Base cabinets, frames, brackets, trusses and wall supports must match the selected material, thickness, span, cutouts and cantilever. A panel reference dimension is not automatically the maximum installed length, and a finished tabletop may need to be divided for transport, room access or safe handling. Send the plan, exposure data and support layout with the quotation request so the selected laboratory countertop can be fabricated as one coordinated assembly.
Product Scope and Configuration Boundary
What the selected worktop fabrication can include
A selected laboratory countertop can be supplied as a finished work-surface section or as coordinated sections for a longer laboratory run. The defined scope can include the selected worktop material, finished length and depth, chosen thickness, front/side/back edge treatment, raised marine edge or drip groove where applicable, backsplash or side splash where specified, and the approved machining for sinks, faucets, cup sinks, fixtures, equipment and service penetrations.
The fabrication drawing should also define return corners, end conditions, seam preparation, colour/finish, underside treatment and the location of any reinforced area. For a resin or ceramic top, the drawing identifies the selected material system and the details that can be produced within that system. For a stainless worktop, the same drawing identifies the grade, gauge, finish, underside reinforcement, welded or separate sink condition and the arrangement of splashes. The worktop is therefore ordered as a specific fabricated part, not merely as a raw sheet or a generic rectangular slab.
Where the project uses multiple materials, each countertop section should have a clear material designation. A chemistry area may require an epoxy or phenolic worktop, a wet-service zone may use a selected stainless construction, and another room may require a ceramic surface. These separate configurations can be coordinated in one furniture project, but they should not be described as one homogeneous product with one shared performance limit.
What remains in the bench, cabinet, sink and building scope
The countertop does not by itself create a completed laboratory workstation. A laboratory wall bench or laboratory island bench supplies the overall furniture layout, base cabinets or support frame, access clearances, storage and service planning. The worktop is selected to fit that supporting assembly, including any spans, brackets, trusses, frames or wall details that must carry its weight and the expected equipment load.
Sinks, faucets, cup sinks, traps, drain lines, gas valves, power fittings and service connections must also be scheduled separately unless an approved order expressly includes them. A countertop can be machined or fabricated for a selected sink and fixture arrangement, but the bowl type, mounting method, waste connection, plumbing responsibility and final sealing detail need to be coordinated with the relevant sink, cabinet and building systems. The same rule applies to equipment feet, cable ports and utility penetrations: the countertop drawing defines the opening, while the equipment or service provider defines the connected component.
Installation conditions remain important even when the worktop is delivered to final dimensions. Site walls may vary from the drawing, a long top may need to be split for access, and field joints need a compatible installation method. Heavy stone, ceramic or resin sections require a planned lifting and delivery route. Final support, site measurement, joint treatment and installation sequence should be confirmed before fabrication is released, particularly where the countertop includes large cutouts, overhangs, full-height splashes or integrated stainless elements.
Materials and Reference Configurations
Solid epoxy resin laboratory worktops
Solid cast epoxy resin is commonly considered when the laboratory needs a monolithic work surface for a chemistry-facing or high-demand work area. A 25 mm epoxy worktop is a useful reference configuration, while 19 mm and 32 mm formats appear in other documented epoxy systems. Some thinner solid-epoxy systems use 15 mm material with their own continuous-support and fabricated-size rules. The intended thickness should therefore be selected with the actual material series, span, edge detail, openings and support arrangement rather than chosen from a general statement that “epoxy is available.”
The selected epoxy configuration can be fabricated as a flat top with project-defined edges, backsplashes, sink openings, fixture holes and joints. Material suitability still depends on the chemical list, concentration, temperature, duration of contact and cleaning method. A high-level material description is not a replacement for a review of the selected work surface against the actual laboratory process.
Solid phenolic resin laboratory worktops
Solid phenolic resin offers a different material route. Compact phenolic reference constructions commonly use 19 mm or 25 mm material, and one documented panel family reaches approximately 3048 x 1524 mm before project fabrication. Phenolic can be useful where the project values a lower-mass solid-grade surface and practical machining, but its final use still depends on the chemicals, heat sources, exposed edges, support span and selected panel system.
Phenolic should not be described as a thinner version of epoxy. Its resin construction, core, fabrication approach and performance data are distinct. The countertop drawing should identify the actual board thickness, edge sealing/detail, cutout geometry, joints and support layout, especially around sink openings, equipment feet, cantilevers and long wall runs.
Technical ceramic laboratory worktops
Technical ceramic is a separate rigid work-surface configuration. One laboratory ceramic reference family uses 25 mm material in formats from 600 x 600 mm to 1800 x 900 mm. That reference is useful for understanding the scale of ceramic worktop sections, but it does not establish the available panel range or joint detail for every ceramic supplier. Ceramic selection should account for the required size, sink/cup-sink geometry, impact conditions, lifting route, support arrangement and the need for a flat or liquid-control edge form.
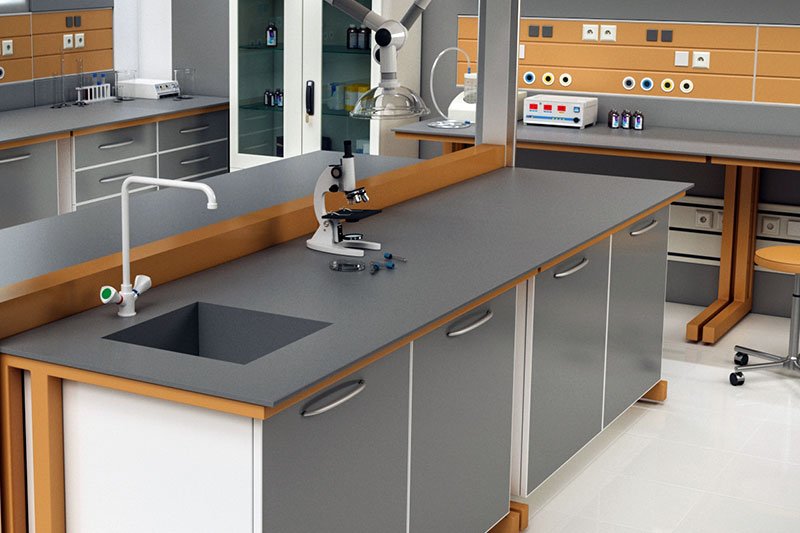
For a ceramic configuration, the project should confirm the exact material system before quoting a chemical-performance statement, colour, edge form or maximum panel size. The structure below the top is equally important because ceramic sections, cutouts and joints need compatible support and handling. The illustrated installation shows a material-specific reference, not the default construction for epoxy, phenolic or stainless worktops.
Stainless steel laboratory worktops
Stainless steel is often evaluated for cleanable wet-service areas, high-moisture locations and selected integral-sink configurations. Type 304 or 316, 14 or 16 gauge and #4 finish are reference options found in stainless laboratory worktop families. Depending on the selected construction, the top can include an underside reinforcement system, sound-deadening treatment, a square or raised edge, a backsplash, a side splash, a drain fall or an integral welded sink.
The stainless specification has to be detailed at component level. Grade, gauge, surface finish, reinforcement, weld preparation, splash height, sink construction and exposure conditions all influence the finished result. A stainless worktop should not be chosen only because it appears cleanable; chlorine-containing cleaners, salts, process chemistry, weld treatment, drainage and cleaning access still need to be reviewed for the selected configuration.
| Material Configuration | Reference Thickness or Format | Fabrication Features That May Be Selected | Boundary to Confirm |
|---|---|---|---|
| Solid cast epoxy resin | 25 mm reference; 19 mm and 32 mm alternatives in documented systems; other 15 mm systems use separate support rules | Flat/radius edge, selected raised edge, drip groove, backsplash, cutouts and joint preparation | Selected resin series, final thickness, chemical/heat conditions, support and fabricated piece dimensions |
| Solid phenolic resin | 19 mm or 25 mm compact-phenolic reference construction; one family lists panels to about 3048 x 1524 mm | Machined sink/fixture openings, selected edges, splashes and joints | Selected panel series, exposed-edge detail, heat/chemical use, span and cutout reinforcement |
| Technical ceramic | 25 mm reference; one family lists 600 x 600 to 1800 x 900 mm formats | Flat work surface, selected sink/cup-sink and accessory openings, coordinated joints | Exact ceramic system, handling, impact condition, colour, edge form and support arrangement |
| Stainless steel | Type 304 or 316; 14 or 16 gauge; #4 finish are reference options | Reinforcement, sound-deadening layer, splashes, drain fall and selected integral welded sink | Grade, gauge, reinforcement, welding, sink/fixture arrangement and process/cleaner exposure |
Edge Profiles, Backsplashes and Liquid Control
Flat, radius and raised edge choices
The front and side edges of a laboratory countertop affect cleaning access, liquid control, user comfort and the way the worktop meets adjacent furniture. A flat or lightly bevelled edge is often chosen for a simple uninterrupted work surface. A radius edge reduces a sharp external corner and can make regular wiping easier. A raised marine edge creates a perimeter detail intended to help retain a spill on the selected countertop area. A drip groove is a separate machined feature that can help direct liquid away from the outer edge in the applicable construction.
These are fabrication choices, not universal product features. A particular raised edge or radius requires the selected material to be capable of that form, and it has to be coordinated with the backsplash, side splash, sink, seam and support below the top. The edge may also change the usable flat area around an instrument, the distance to a fixture hole and the way a countertop section is transported or joined. The approved drawing should show the profile rather than relying on a verbal instruction such as “spill edge.”

An edge profile should be evaluated with the actual work. A chemistry bench handling open vessels may need a different liquid-control detail from an analytical instrument area where cables, trays or equipment feet occupy the top. A sink station can need a related backsplash, side splash or drain direction. A teaching lab may prioritize smooth cleaning and edge durability. There is no single “best” profile without the material, exposure and layout information.
Backsplashes, side splashes and drip grooves
Backsplashes and side splashes help define how the worktop meets a wall or ends at an exposed side. Their material, height, joint treatment and sealing detail should be selected together with the countertop. A raised rear splash in the same material may be appropriate in one resin or stainless construction, while a ceramic work surface or a different panel system can require its own compatible wall junction. The wall condition and actual site dimensions also matter; a perfectly straight fabricated rear edge may still need a planned sealant or filler detail when installed against a real wall.
Drip grooves and pitched areas should be used only where the selected material and configuration support them. They are not a substitute for a well-designed sink area, containment system or cleaning procedure. If liquid needs to be directed to an integral sink, the sink location, edge form, fall, outlet, backsplash and cabinet/plumbing coordination need to be presented on the same drawing. Where containment is essential, confirm the specific process requirement before choosing a raised edge rather than assuming that an ordinary countertop detail will manage every spill scenario.
Sink, Fixture and Equipment Cutouts
Drawings required for openings
An opening should never be specified only as “sink cutout” or “service hole.” The fabrication drawing needs the centre line from finished edges or room datum lines, the opening width and depth, corner radius, required edge clearance, fixture or bowl type, mounting method and any local support or reinforcement. For a long run, the drawing should also show the nearest joint, backsplash, side splash, cabinet division and the support members below the worktop. These details prevent an opening from being placed where it weakens a selected material section or conflicts with a cabinet, pipe, drawer or equipment foot.
Sink and fixture requirements start with the actual component. Provide the sink or cup-sink drawing, flange or undermount condition, bowl depth, drain position, faucet or service-valve holes and the planned clearance for traps and plumbing. Equipment cutouts require the equipment base plan, cable/busway requirements, heat or ventilation clearance and the location of concentrated load points. Cable and data openings should also be defined by diameter, cover/grommet requirement and the required distance from liquids or a raised edge.
Material-specific sink and cutout boundary
Different materials use different fabrication methods. A resin or phenolic worktop can be machined for an approved sink, faucet or equipment opening when the selected material system and support arrangement allow it. A ceramic worktop needs compatible hole geometry, handling and support planning. A stainless steel worktop can be produced as a selected welded assembly with an integral sink, splashes and reinforcement, but that is a stainless-specific construction rather than a default feature of every laboratory countertop.
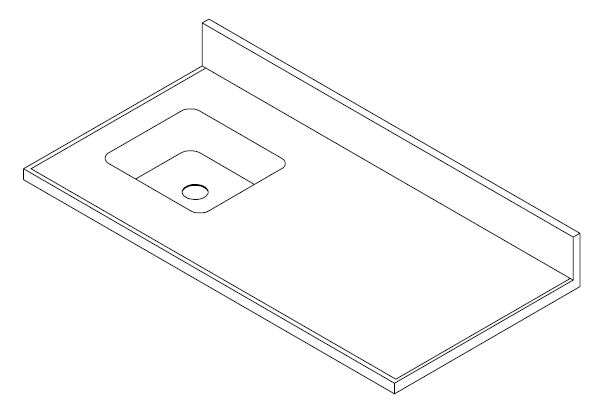
The decision to use an integral welded sink should be made with the stainless grade, gauge, finish, weld treatment, splash detail, drain location and cabinet/plumbing arrangement. A separate sink installed into a resin, phenolic or ceramic top has different requirements for its opening, mounting, sealant and support. Do not carry the welded-sink language from a stainless configuration into another material description.
| Fabrication Decision | Required Drawing Data | Material Interaction | Confirm Before Fabrication |
|---|---|---|---|
| Sink or cup-sink opening | Centre lines, bowl/model, W x D, corner radii, flange/undermount condition, drain location and edge clearance | Opening shape, mounting and local support differ between resin, phenolic, ceramic and stainless configurations | Selected worktop material, sink supply scope, sealant, support and plumbing coordination |
| Faucet, gas or service fixture hole | Fixture template, hole diameter, centre line, mounting thickness and service route | A hole may need a selected reinforcement/detail and must avoid edges, seams and adjacent cutouts | Fixture model, number of holes, service responsibility and clearance below the top |
| Equipment or instrument cutout | Equipment drawing, opening size, corner radii, load points, cable/heat clearance and access path | Large openings can change the support requirement and material handling method | Equipment final model, load, frame/cabinet support and site installation sequence |
| Cable or data penetration | Diameter, grommet/cover, centre line, cable bend radius and separation from wet work | Small openings still need a compatible finish and a location away from splash zones | Cover material, electrical/data scope, edge distance and under-top clearance |
| Raised edge, backsplash or side splash near an opening | Profile section, height, return direction, joint location and relation to the opening | Edge form can limit fixture access or change the required sink/cover detail | Material compatibility, liquid-control requirement, cleanability and adjacent wall condition |
| Joint or support near an opening | Seam location, support member location, fastener/adhesive method and transport section | Openings should not be placed without regard to joints, spans, cantilevers or lifting points | Final shop drawing, installation method and responsible site measurement |
Support, Joints, Delivery and Installation Planning
Support and span follow the selected material and fabrication
The structure below a laboratory countertop must be designed for the selected material, thickness, finished depth, joints, openings, equipment loads and any cantilever. Base cabinets, open steel frames, wall brackets, front/rear rails and truss members can all form part of the support arrangement, but the spacing and load path are not transferable from one material configuration to another. A thin solid-epoxy system, a 25 mm ceramic section, a compact phenolic board and a reinforced stainless assembly can require different support details even when their finished plan dimensions are similar.
Cutouts and overhangs deserve separate attention. A sink opening, a large equipment penetration, an L-shaped corner or a long unsupported return can change how the worktop is carried. The support drawing should show cabinet/module divisions, support rails, brackets, wall fixing, equipment feet and areas where lifting or handling is restricted. Do not place a seam or support break solely from cabinet widths when it conflicts with a sink, fixture, cutout or high-load location above.
Joints, transport and field conditions
Long laboratory runs are often divided into manageable sections for fabrication, transport and installation. The joint method must be compatible with the selected material and edge form. A resin system may use a material-specific seam preparation and adhesive process, a ceramic layout may need its own joint and handling solution, and a stainless construction may use a mechanical or welded detail defined for the final assembly. The planned seam locations should be visible on the approved drawing before the countertop is released.
Delivery planning is particularly important for long, thick or heavy countertop sections. Check door widths, elevators, corridors, turns, floor transitions, lifting access and the route to the final laboratory. A countertop that is practical in the fabrication drawing may need different section lengths once delivery and installation are considered. Site measurement is also essential where worktops meet irregular walls, existing casework, columns, fume hoods or service risers.
During installation, protect exposed edges, finished surfaces and pre-machined openings. Set the selected support level before finalising joints or sealing a backsplash to the wall. Coordinate sinks, fixtures, equipment, power fittings and service connections so that their installation does not force late unplanned drilling or cutting. Final seams, edge seals and wall junctions should follow the approved material-specific installation detail rather than a generic field method.
Applications and Product Fit
Material selection by laboratory exposure and working method
Solid epoxy resin is often evaluated for chemistry-facing work areas where the selected material series is appropriate for the actual chemical and temperature conditions. Solid phenolic resin can be considered for laboratories that need a solid-grade surface with different weight and fabrication priorities. Technical ceramic may be reviewed for a hard, rigid work-surface configuration when its selected panel format, impact conditions and support plan suit the project. Stainless steel is commonly evaluated for wet-service, cleanable or selected integral-sink configurations, provided that the actual grade, gauge, cleaner exposure and weld details are defined.
These are starting points, not automatic answers. A chemical list, spill pattern, hot equipment, cleaning regimen, moisture, impact, equipment mass, expected service life and available budget should be considered together. A material that is suitable for a sink zone may not be the best choice for a high-heat chemistry bench, and a material chosen for a continuous work surface may require a different configuration around a large equipment opening. The final selection should state both the material and the exposure conditions it is intended to address.
When a full laboratory bench is the better product
Use a stainless steel laboratory bench when the buyer needs a complete all-metal workstation with its worktop, support structure, principal cabinetry and optional wet-service elements planned together. That product has a different decision path because the frame, storage, grade selection, sink and room layout are part of the primary purchase.
Use a laboratory wall bench or laboratory island bench when the project needs a complete perimeter or double-sided furniture system. A laboratory countertop can be one selected component of those systems, but it is not a substitute for the cabinet layout, structural support, storage, services and clearance plan that make the bench usable.
Related Laboratory Furniture
Pair the selected work surface with a laboratory wall bench for a perimeter run or a laboratory island bench for a double-sided central layout. Compare a stainless steel laboratory bench when an all-metal workstation is required, a laboratory base cabinet when storage is the main purchasing unit, or a laboratory sink base cabinet for a dedicated wet-service module.
Frequently Asked Questions
Is one laboratory countertop material suitable for every laboratory task?
No. Solid cast epoxy, solid phenolic, technical ceramic and stainless steel are separate material systems. They should be compared against the actual chemical list, concentrations, operating and cleaning temperatures, moisture, impact exposure, equipment loading, required edge detail and the support available below the work surface. A material label alone does not define the finished laboratory countertop. The selected series, thickness, fabrication details and installation conditions must be agreed for the intended work area.
What is included when specifying a laboratory worktop rather than a complete bench?
A laboratory countertop normally covers the fabricated work surface: the selected material, finished plan dimensions, approved edges, backsplashes or drip details, seams and scheduled cutouts. Cabinets, frames, brackets, sinks, faucets, utilities and site installation are separate items unless the quotation explicitly includes them. Provide the related bench or support drawing so that the countertop can be coordinated with those components instead of being treated as an isolated panel.
Can the countertop include a sink, faucet or equipment opening?
Yes, provided the required geometry is supplied before fabrication. The drawing should identify each opening, its centre line, finished width and depth, corner radii, mounting method, adjacent edge distance and any fixture or service connection. Sink and equipment openings affect support, joint locations, delivery handling and the selected material detail, so they should not be added after the worktop layout has been released.
Are the published thicknesses and sizes fixed order dimensions?
No. The published dimensions on this page are reference formats used to start material and fabrication discussions. Finished length, depth, thickness, panel division, seam positions and support spacing depend on the selected material family, available format, site access, cutouts, edge design and the approved drawing. A long run may be divided into multiple sections for transport and installation even when a continuous appearance is required.
What information is needed for a project-ready laboratory countertop quotation?
Send the laboratory layout or worktop drawing, finished dimensions, proposed material, chemical and cleaning exposure, temperature and equipment information, sink/fixture/electrical/equipment cutout schedule, edge and backsplash preference, support or cabinet layout, delivery access and quantity. If the material has not been selected, include the working process and chemical list so that the material decision can be reviewed before dimensions are finalised.
Contact the Xicheng Engineering Team Today
For a laboratory countertop enquiry, send the room or bench layout, worktop dimensions, expected chemicals and cleaning conditions, proposed material, required openings, edge details and support arrangement. This allows the work surface, joints, cutouts and installation constraints to be reviewed together rather than quoting a generic panel size.
Shenzhen Office: No. 34 Zhenxing Road (Shengtaian Heavy Industrial Park B), Loucun, Guangming New Dist, Shenzhen, Guangdong, China
WhatsApp: +86 18126478161
Engineering Mailbox: fanalax34@gmail.com